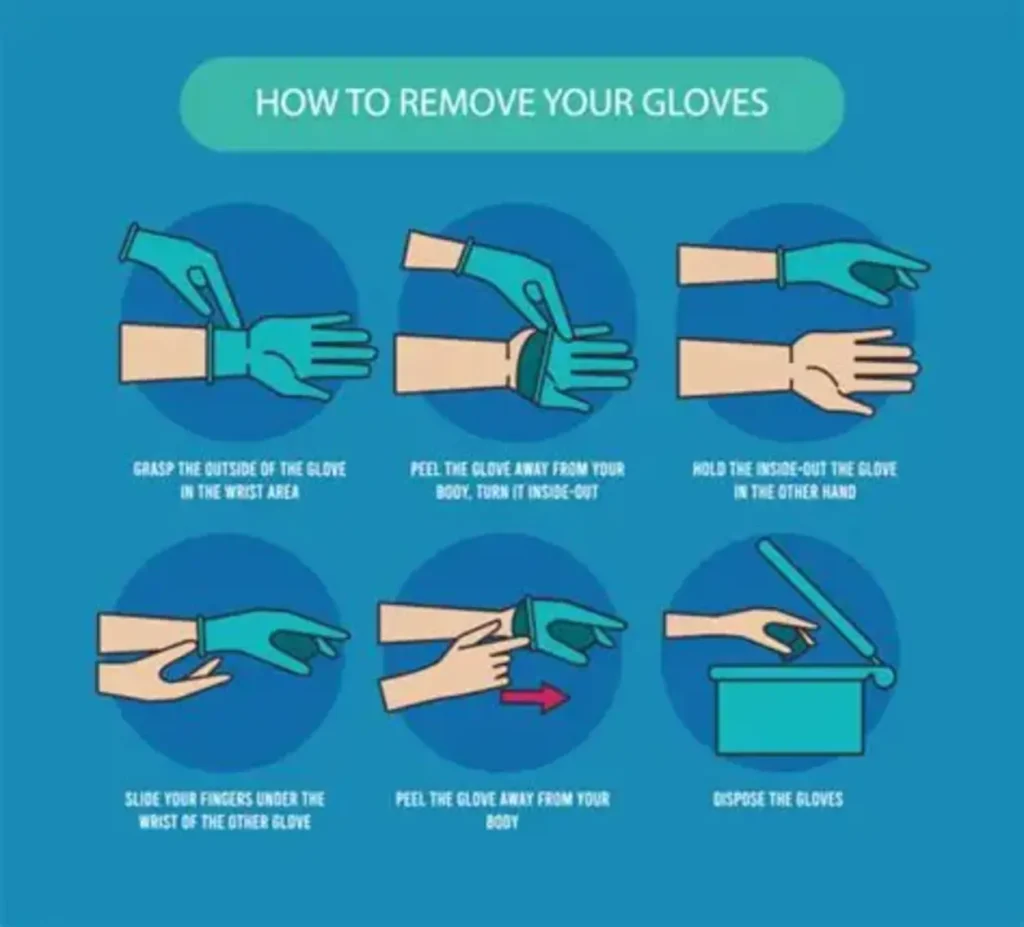
6-Step Method for Hygienic Glove Removal – Disposable gloves are an essential part of workplace safety in healthcare, laboratories, food processing, manufacturing, and many other industries. They serve as a protective barrier that helps prevent contamination, reduces the spread of harmful microorganisms, and protects workers from hazardous substances. However, wearing gloves correctly is only half of the equation. Removing them improperly can transfer contaminants from the glove surface to your hands, clothing, or surrounding environment.
Many workplace contamination incidents occur not because gloves fail, but because they are removed incorrectly. Even high-quality gloves cannot provide complete protection if proper glove removal procedures are ignored. Learning the correct technique minimizes the risk of cross-contamination and helps maintain a safe, hygienic workplace.
This guide mitrasaruta explains the 6-step method for hygienic glove removal, why it matters, and additional best practices for maintaining workplace hygiene.
Why Proper Glove Removal Matters
Throughout a work shift, gloves may come into contact with bacteria, viruses, chemicals, oils, dirt, food residue, or other contaminants. The outer surface of the glove should always be considered contaminated after use.
Touching the outside of the glove with bare skin during removal defeats the purpose of wearing protective gloves. Proper glove removal helps:
- Reduce the spread of germs and contaminants
- Protect workers from chemical or biological exposure
- Maintain product quality in manufacturing
- Improve workplace hygiene standards
- Support compliance with occupational safety regulations
Proper glove removal is especially critical in industries where cleanliness directly impacts health and product safety.
Step 1: Pinch the Outside of One Glove
Begin by identifying the wrist area of one glove. Using the opposite gloved hand, pinch only the outside surface near the wrist.
Avoid touching your skin during this process. The goal is to handle only the contaminated outer layer of the glove.
Pull the glove downward slowly while turning it inside out as it comes off your hand.
The removed glove should remain held in your still-gloved hand.
Step 2: Remove the First Glove Carefully
Continue pulling until the first glove is completely removed.
As the glove turns inside out, it traps contaminants within the folded material, reducing the chance of spreading them.
Do not throw the glove away yet. Instead, keep it securely held in the palm of your gloved hand while preparing to remove the second glove.
This technique minimizes unnecessary contact with contaminated surfaces.
Step 3: Slide Fingers Under the Remaining Glove
With one hand now ungloved, avoid touching the contaminated exterior of the second glove.
Instead, slide two fingers underneath the cuff of the remaining glove. Your fingers should contact only the clean inner surface.
This is one of the most important steps because touching the outside of the glove with bare fingers may transfer contaminants directly to your skin.
Step 4: Peel Off the Second Glove
Pull the second glove downward while turning it inside out.
As you remove it, the second glove should wrap around the first glove that you are already holding.
Both gloves become enclosed together in a compact bundle with contaminated surfaces folded inward.
This technique significantly reduces the risk of contamination.
Step 5: Dispose of Gloves Properly
Immediately discard the used gloves into an appropriate waste container according to your workplace procedures.
Never place used gloves on work surfaces, equipment, or in your pocket.
Depending on the industry, gloves may require disposal as:
- General waste
- Medical waste
- Biohazard waste
- Chemical hazardous waste
Following proper disposal procedures protects both employees and the environment.
Step 6: Wash or Sanitize Your Hands
Even after removing gloves correctly, hand hygiene remains essential.
Gloves may have microscopic defects or tiny tears that are not visible during use. Additionally, accidental contamination can occur while removing them.
Wash your hands thoroughly using soap and clean running water for at least 20 seconds.
If soap and water are unavailable, use an alcohol-based hand sanitizer containing at least 60% alcohol until proper handwashing is possible.
This final step completes the glove removal process and provides an additional layer of protection.
Common Mistakes to Avoid
Many people unknowingly increase contamination risks through improper glove removal. Some of the most common mistakes include:
Touching the Outside Surface
The outer glove surface should always be considered contaminated.
Touching it directly with bare hands increases exposure to harmful substances.
Snapping Gloves Off
Some workers quickly snap gloves off their hands.
This can disperse contaminants into the surrounding air or onto nearby surfaces.
Instead, remove gloves slowly and deliberately.
Reusing Disposable Gloves
Disposable gloves are designed for single use only.
Reusing them compromises their protective barrier and increases contamination risks.
Always replace gloves after each task or whenever they become damaged.
### Skipping Hand Washing
Some workers believe gloves eliminate the need for hand hygiene.
In reality, proper handwashing remains essential after every glove removal.
When Should Gloves Be Changed?
Disposable gloves should be replaced whenever they become:
- Torn or punctured
- Visibly dirty
- Contaminated by hazardous materials
- Wet inside
- Worn for extended periods beyond manufacturer recommendations
- Used between different tasks or patients
Changing gloves at the appropriate time helps maintain effective protection and reduces cross-contamination.
Choosing High-Quality Disposable Gloves
Safe glove removal begins with selecting quality gloves designed for your application.
Important factors include:
- Proper fit
- Good puncture resistance
- Chemical compatibility
- Comfortable flexibility
- Reliable grip
- Compliance with industry standards
Different industries may require different glove materials such as nitrile, latex, vinyl, or neoprene. Selecting the right glove improves both comfort and workplace safety.
Building Better Workplace Hygiene
Proper glove removal should become a routine habit rather than an afterthought. Employers can reinforce safe practices by providing regular training, displaying instructional posters, and ensuring employees have easy access to handwashing stations and appropriate waste containers.
Creating a strong hygiene culture helps reduce workplace illnesses, improve productivity, and demonstrate a commitment to employee safety.
Conclusion
The 6-step method for hygienic glove removal is a simple yet highly effective practice that significantly reduces the risk of contamination. By carefully removing gloves without touching contaminated surfaces, disposing of them correctly, and following up with proper hand hygiene, workers can protect themselves, their colleagues, and the products they handle.
Whether you work in healthcare, laboratories, food processing, manufacturing, or industrial environments, mastering proper glove removal is an essential part of workplace safety. Combined with high-quality disposable gloves and consistent hygiene practices, this straightforward six-step process helps create a cleaner, safer, and more professional working environment for everyone.