what is a z seam 3d printing
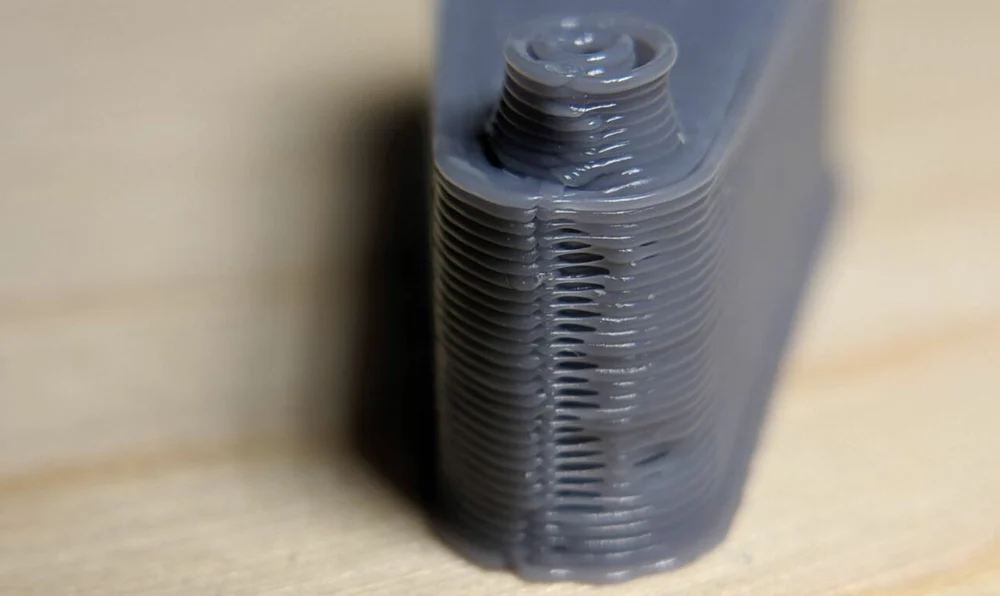
Z Seam is a visible line on the side of a 3D print where each layer begins and ends. A seam looks like a row of small bumps and can detract from the appearance of the print. This type of seam usually doesn’t make the print look bad, but it can be a problem for decorative or high-precision parts. This guide will show you what causes a Z-seam, how to stop it, and ways to hide it using the slicer settings.

What Causes Z-Shaped Seams?
Z-seams occur due to the way 3D printers build objects layer by layer. As the nozzle moves to the next layer, it stops pushing out plastic, so excess plastic leaks out, creating small bumps. These bumps line up in a straight line along the Z-axis, creating a Z-seam.
Some things will make the Z-seam more visible
When the nozzle stops and pressure builds: When the nozzle stops moving before starting a new layer, the pressure on the hot end pushes out the excess plastic.
- Layer Arrangement: Most slicers place the start of the new layer directly above the old layer to minimize movement. This creates a long slit.
- Appearance of the Model: Tall prints and round objects are more likely to show a Z-seam because the seam is so visible on smooth surfaces.
- Slice Settings: If the slicer does not have good control over the starting point, the seams may appear randomly or in groups and therefore look worse.
How to Stop Z-Seams
To stop a Z-seam, you need to control the plastic flow and pressure at the hot end. Here are the main methods.
Extruder Calibration
Ensuring that the plastic flows out correctly will help stop excess buildup. To calibrate:
- Check how much plastic the printer is pushing out compared to what you are asking it to do.
- If necessary, change the number of steps per millimeter (E-steps) of the extruder.
Change the Flow Rate
The flow rate controls the amount of plastic extruded. Setting the flow rate correctly will result in an even extrusion of plastic, thus reducing the buildup of excess plastic.
Controlling Nozzle Temperature
When the nozzle temperature is too high, more plastic will flow out and may cause excess plastic to flow from layer to layer. If the nozzle temperature is lower (but still hot enough for the type of plastic), the seams are less visible.
Changing the Print Speed
A slower print speed means that the printer moves more smoothly and therefore less plastic is collected when a new layer starts to print.
Use Retraction
The retraction feature pulls the plastic back a little before moving to the next layer, thus reducing plastic leakage. Turning on retraction when changing layers can help with Z-seam problems.
Using Panning
Stop pushing out the plastic before the end of the layer so that the pressure in the nozzle pushes out the remaining plastic. This means less excess plastic in the seams.
Use Wipe
The wipe feature moves the nozzle slightly after completing a layer to push out excess plastic before moving on to the next layer. This helps disperse the excess plastic rather than leaving it in one place.
Using Linear Advance
Linear advance is a printer setting that calculates and varies the amount of plastic output based on print speed. This helps keep the flow of plastic steady and prevents lace from forming when you start printing a layer.

How to Hide a Z-Seam
If you can’t stop a Z-seam, then you can try to hide it. Slicer Setup gives you different ways to hide the Z-seam.
Change the Z Seam Alignment
Most slicers, such as the Cura, have four ways to align the Z-seam.
- User Specified: You can place the Z-seam where you want it, such as on the back of a print.
- Shortest: This makes the travel distance smaller, but usually produces a straight bump.
- Random: This places the seams in different places, so you see fewer seams, but may produce small dots.
- Sharpest Corner: This places the Z-seam in the sharpest corner of the model so it fits better into the model.
Using Seam Corner Preferences
Some models have many corners where seams can be hidden. You can choose from the following:
- Hide Seam: This places the seam in the inside corner so you see less of it.
- Expose Seam: This puts the seam on the outside, which is a good option if you want to fix the seam later.
- Smart Hide: This puts the seam where it looks best on its own.
Open Spiral Outer Profile (Vase Mode)
For prints with only one wall, such as vases, turning on the Spiralized Outline in Cura will keep the nozzle moving, so no Z-shaped seams will appear.
Turning the Model
Simply rotate the model in the slicer to put Z-seams where you can’t see them, such as hidden backs.
Change the Model Shape
Adding small features or sharp edges to the model gives the slicer more places to hide seams.
Fixing Z-seam Problems
If you still see Z-seams after trying these methods, you can try these fixes.
- Find a slicer update: Some older versions may have problems that cause unexpected Z-seams. Make sure you have a good version.
- Check the nozzles: Worn nozzles can cause the plastic to spray unevenly, so the seams look worse.
- Make sure the print base is flat: an uneven base will make the layers stick together badly, making the seam look worse.
- Use quality plastic: cheap or poor-quality filament will make the plastic come out differently, making the seams look worse.

Final Things to Know
Z seams are common in 3D printing, but they can be made smaller or hidden if used in the right way. By changing the way the plastic is molded, turning on good slicer functions, and placing the model in the correct position, you can make the print look better. If you want to make Z-seams smaller or eliminate them altogether, trying these methods will help you produce smoother, better-looking prints.