Knowing how to screenshot on a Dell is an essential skill for both casual and professional computer users. Whether you’re capturing important information, saving a visual record for reference, or creating tutorials, screenshots are a quick and effective tool. Dell laptops and desktops, like most Windows-based devices, come with multiple built-in ways to take screenshots. These methods vary in complexity and functionality, from basic full-screen captures to selective window grabs or advanced snipping tools.
One of the key advantages of Dell computers is their compatibility with Windows operating systems, which means you can use both shortcut keys and software utilities to capture your screen. In this article, we will cover several easy-to-follow methods for taking screenshots on Dell devices, including keyboard shortcuts, Windows tools, and third-party applications.
Method 1: Using the Print Screen (PrtScn) Key
Full-Screen Capture
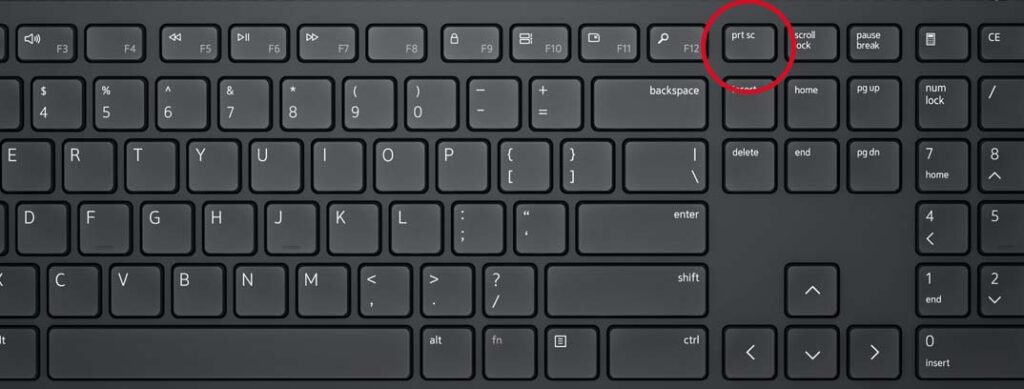
So, how to screenshot on a Dell? The simplest way to take a screenshot on a Dell is by pressing the Print Screen key, often labeled as “PrtScn” or “PrtSc.” This key is usually found in the top row of your keyboard. When pressed, it captures the entire screen and copies it to your clipboard. You can then paste it into an image editor such as Microsoft Paint, Photoshop, or even a Word document by pressing Ctrl + V.
Active Window Capture
If you only want to capture the currently active window instead of the whole screen, you can use the combination Alt + PrtScn. This method is great for avoiding unnecessary parts of your desktop, focusing only on the relevant window. Like the full-screen method, the image is stored in your clipboard until pasted.
Saving Directly to the Pictures Folder
On Windows 8, 10, and 11, you can press Windows Key + PrtScn to take a screenshot and automatically save it as a PNG file in your Pictures > Screenshots folder. This is a faster way to save images without manually pasting them.
Method 2: Using the Snipping Tool and Snip & Sketch
Snipping Tool
If you are wondering how to screenshot on a Dell, the Snipping Tool is a built-in Windows application that allows you to select a specific portion of your screen. Open it by searching “Snipping Tool” in the Start menu. You can choose from different snip types, including free-form, rectangular, window, or full-screen snips. After capturing, you can annotate or highlight important parts directly in the tool before saving.
Snip & Sketch (Windows 10 and 11)
An upgraded version of the Snipping Tool, Snip & Sketch, offers better editing options and more control over your screenshots. You can open it using Windows Key + Shift + S, which dims your screen and provides four snipping options: rectangular, freeform, window, and full-screen. Screenshots are copied to your clipboard and can be saved or edited further.
Why Use These Tools
These tools are ideal for people who frequently need to highlight, crop, or mark up screenshots. Instead of capturing the whole screen and editing later, you can grab exactly what you need right away.
Method 3: Advanced Methods – Game Bar and Third-Party Software
Game Bar for Gamers
If you’re a gamer and want to know how to screenshot on a Dell while playing, the Xbox Game Bar (built into Windows) is a convenient option. Press Windows Key + G to open it, then click the camera icon to take a screenshot. Game Bar automatically saves your captures in the Videos > Captures folder.
Third-Party Screenshot Tools
If you require advanced features such as scheduled captures, scrolling screenshots, or cloud storage, third-party applications are worth exploring. Popular options include Lightshot, Greenshot, and ShareX. These tools often allow instant uploads to the web, quick editing, and the ability to capture long web pages or documents that extend beyond the visible screen.
When to Use Advanced Tools
Advanced tools are particularly useful for content creators, teachers, and professionals who need high-quality, customizable screenshots. They often save time by combining capture, editing, and sharing features in one place.
Method 4: Organizing and Editing Your Screenshots
Editing Screenshots
After learning how to screenshot on a Dell, the next step is enhancing your captures. Use built-in tools like Microsoft Photos or Paint to crop, rotate, adjust brightness, and add text. For more advanced needs, applications like Photoshop or GIMP offer professional editing capabilities.
Organizing Screenshots
It’s easy to accumulate hundreds of screenshots over time. To stay organized, create folders based on categories such as “Work,” “School,” or “Personal.” You can also rename files with descriptive names instead of relying on default timestamps, making them easier to find later.
Sharing Screenshots
Screenshots can be quickly shared through email, cloud storage services like OneDrive or Google Drive, or instant messaging platforms. Many third-party screenshot tools allow you to share directly after capturing, saving valuable time.
Common Issues and Troubleshooting
Print Screen Not Working
If the Print Screen key isn’t working, check your keyboard settings or ensure that the “Fn” key isn’t interfering. On some Dell laptops, you must press Fn + PrtScn instead of just PrtScn.
Image Not Saving Automatically
If you’re using Windows Key + PrtScn and don’t see your image in the Pictures > Screenshots folder, check whether your OneDrive or Dropbox is set to auto-save screenshots, as they may be redirected there.
Low-Quality Screenshots
If your screenshots appear blurry, ensure your screen resolution is set to its native resolution. Higher resolution means clearer images.
Tips for Better Screenshot Usage
Use Keyboard Shortcuts Frequently
Familiarizing yourself with shortcuts can save time. For example, Alt + PrtScn is excellent for quickly capturing active windows during multitasking.
Combine Screenshot Methods
You don’t have to rely on just one method. For instance, you can capture with Snip & Sketch, edit in Paint, and share via OneDrive for a streamlined workflow.
Keep Your Tools Updated
If you use third-party screenshot software, keep it updated to access new features and maintain compatibility with your system.
Conclusion
Mastering how to screenshot on a Dell is a valuable skill that enhances productivity, communication, and record-keeping. From quick keyboard shortcuts to powerful editing tools, Dell devices offer numerous ways to capture exactly what you need. Whether you’re a student saving lecture slides, a professional creating training material, or a gamer capturing memorable moments, knowing the right method for your situation can save time and improve results.
By exploring different screenshot options—Print Screen, Snipping Tool, Game Bar, and third-party apps—you can select the most efficient approach for your tasks. Regularly organizing and editing your captures will keep your files easy to find and ready for use. With these techniques, you’ll be able to take clear, precise, and professional-looking screenshots every time you need them.
Frequently Asked Questions
Q1. How do I take a screenshot on a Dell laptop?
Press the PrtScn key to capture the entire screen and paste it into an image editor like Paint.
Q2. How do I screenshot only the active window?
Press Alt + PrtScn to capture just the active window and paste it into an editor.
Q3. Can I take a screenshot and save it automatically?
Yes, press Windows + PrtScn to save the screenshot directly in the “Pictures > Screenshots” folder.
Q4. How do I screenshot on a Dell using Snipping Tool?
Open the Snipping Tool or Snip & Sketch, choose your snip type, and capture the area you want.
Q5. What if the PrtScn key doesn’t work on my Dell?
Check your Fn key settings or update your keyboard drivers.