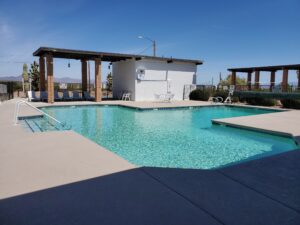
Solar pool heaters are popular with homeowners. They provide warm pool water without the high costs of gas or electric heating. A solar pool heater is a very efficient and reliable method if you want to extend your swimming because it makes use of the sun to heat the water naturally. Meanwhile, a lot of pool owners have no idea what the installation process looks like.
Homeowners can set the right expectations by learning how to install a solar pool heating system. This step-by-step process helps them avoid common mistakes and enjoy the system for years. In fact, if the solar pool heater is installed properly, it can be very efficient for a number of years with little need for servicing.
Step 1: Evaluating the Installation Site
The initial step of solar pool heater installation involves inspecting the possible panel locations. Generally, the solar pool heaters need to be in the sun all day long in order to work efficiently. People typically choose their roofs, some ground racks, or a pool equipment area for the solar panels.
During this stage, installers assess:
- Amount of sunlight exposure
- Condition of the surface for placing the panels
- Distance to the current pool equipment
- Direction and angle of the roof, if relevant
Considering the location is crucial for a system that captures enough solar energy. It should also avoid any shading or ventilation issues.
Step 2: Sizing the Solar Pool Heater System
To heat a pool efficiently, it is very important to get the system size right. The number of panels you need depends on several things, like pool size and how warm you want the water. Other factors include how often you use the pool and the climate in your area.
If the system is too small, it might not be able to keep the temperature comfortable consistently, but a too-big system might be wasteful. Sizing correctly helps a solar heater for pool applications give you the right temperature all the time without any hassle.
Step 3: Mounting the Solar Heating Panels
Once the site and system size are confirmed, the solar heating panels are installed. Fixings are selected based on the installation surface. This ensures the solar heating panels are solid and durable.
Some of the primary considerations during the mounting are:
- Correct attachment to the structure for stability and durability
- Ensuring appropriate gaps between the panels
- Positioning for maximal solar radiation
Good mounting protects solar panels from damage and helps them absorb solar heat all day.
Step 4: Connecting the Plumbing System
After the panels are secured, they are linked to the pool’s current circulation system. Water from the pool is routed through the solar heating panels, which increase its temperature before it is returned to the pool.
Plumbing integration usually entails:
- Tapping the water inlet and outlet lines
- Fitting of bypass valves for flow control
- Checking the correct positioning and sealing
This ensures that the solar pool heater works efficiently with the pool pump and filtration system.
Step 5: Installing Flow Control and Regulation
Flow control is a crucial aspect of installing a solar pool heater. Water flows through the panels only when valves or simple controls allow it. This keeps the system running under optimal heating conditions.
Proper regulation of the flow also assists:
- The prevention of overheating
- The maintenance of a stable water temperature
- Lowering the level of system wear and tear that is unnecessary
This simple control strategy greatly boosts the system’s long-term reliability.
Step 6: Testing and System Optimization
Once the installation is over, the whole system is run through a series of tests to make sure everything is working properly. Tests include leak detection, water flow verification, and checking if the panels are heating the water as expected.
You can make small tweaks now to improve performance and ensure the system runs at its best from the start.
Why Proper Installation Matters
Solar pool heaters are generally very reliable. Besides, wrong installation will lower the performance and shorten the system’s lifespan. Proper installation is guaranteed to:
- Increase heat transfer to the highest level
- Allow water to be circulated in an efficient way
- Reduce the amount of maintenance to a minimum
- Make the system last for a long time
So, it’s smart to team up with skilled techs or follow the manufacturer’s installation instructions closely.
Key Takeaway
Installing a solar pool heater is a simple job that results in great benefits over time if the work is done right. Homeowners can have a steady, energy-saving, warm pool by taking steps one at a time. They must check the place, choose the right size system, and fix the panels firmly. They also need to do the plumbing carefully.
A properly installed solar heater for pools provides reliable warmth and steady performance. It allows for more swimming days each year without the high costs of traditional heaters.
Frequently Asked Questions
- How long does solar pool heater installation take?
Most home installations typically take a day or two at most, depending on how big the system is and where it is placed.
- Does installation require major pool modifications?
Solar pool heaters fit right into existing pool circulation systems, so no big changes are needed.
- Can a solar heater for pool use operate automatically?
Indeed. Some systems incorporate automatic flow regulation through the use of simple valves or controls.
- Is roof installation required for solar pool heaters?
Not necessarily. Solar panels may be placed on a roof, a rack, or even directly on the ground.
- Will installation affect pool pump performance?
If sized correctly, solar pool heaters can be run with standard pool pumps without any loss of circulation.