Convert Image to Embroidery File
Have you ever seen a fantastic logo, a beloved pet’s photo, or a simple graphic and thought, “That would look amazing on a hat or a tote bag?” You’re not alone. The desire to turn digital images into stitched reality is common, but the process isn’t as simple as just hitting “print.” Converting a regular image into a format an embroidery machine can understand requires a special process called digitizing.
This guide will walk you through everything you need to know to Convert Image to Embroidery File. We’ll break down the process, explore your options, and offer tips to set you up for success, even if you’ve never threaded a needle before.
What Does “Convert Image to Embroidery File” Actually Mean?
At its core, this process is a translation. You’re taking a standard image file—like a JPG, PNG, or BMP—and translating it into a specialized embroidery file format. Your home printer understands a PDF or JPEG file, but an embroidery machine needs a set of instructions written in a language it knows. These instructions tell the machine exactly where to move, what color thread to use, and what type of stitch to make.
This translated file is called a digitized file. Common machine embroidery formats include:
-
.DST: A widely compatible format for Tajima machines.
-
.PES: The native format for Brother and Babylock machines.
-
.EXP: Used for Melco and Bernina machines.
-
.XXX: Used for Singer and Compucon machines.
You can’t just change a .JPG file extension to .PES and expect it to work. The conversion requires a dedicated process to map out the stitches.
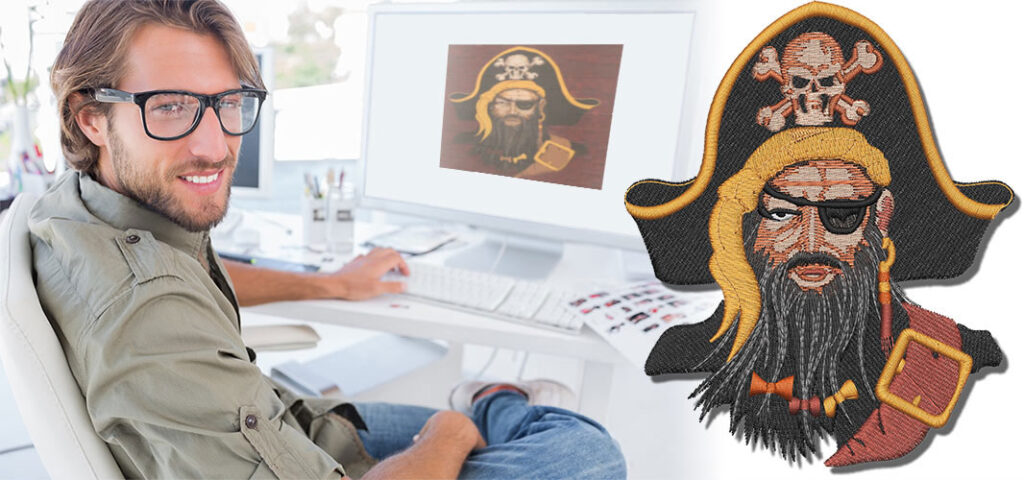
The Heart of the Process: Embroidery Digitizing
Think of digitizing like being a cartographer for your embroidery machine. You are creating a detailed map that the machine will follow stitch by stitch. A good digitizer doesn’t just trace an image; they make artistic decisions about how to best represent it in thread.
This involves defining:
-
Stitch Types: Should an area be filled with a satin stitch (shiny, for text and borders) or a fill stitch (for covering large areas)?
-
Stitch Direction: The angle of the stitches can create light, shadow, and texture.
-
Underlay: This is the foundation of stitches, laid down first to stabilize the fabric and create a smooth surface for the top stitches.
-
Density: How close together the stitches are. Too dense, and the design becomes stiff; too sparse, and the fabric shows through.
-
Pull Compensation: Fabric stretches and pulls under the needle. The digitizer must account for this to prevent gaps and distortions.
This is why the conversion is more of an art than a simple automated task.
Your Options for Converting an Image
So, how do you actually get this done? You have three main paths, each with its own pros and cons.
1. Auto-Digitizing Software
This is the “quick and easy” button of the embroidery world. Many software programs offer an auto-digitize function where you upload your image, and the software attempts to convert it automatically.
Pros:
-
Speed: It’s incredibly fast.
-
Cost-Effective: Often included in beginner or mid-level software suites.
-
Good for Simple Graphics: Works decently for very basic, high-contrast images like logos with clear lines.
Cons:
-
Lack of Control: You have little say in stitch type, direction, or density.
-
Poor Results with Complex Images: Photos, gradients, and detailed artwork often turn into a messy, stitch-heavy nightmare. The software can’t interpret shadows and details like a human can.
-
Inefficient: Auto-digitized designs often use far more thread and stitches than necessary.
Best for: Beginners experimenting with very simple shapes and text.
2. Manual Digitizing Software
This is the professional’s choice. Software like Hatch, Wilcom, and Embrilliance allows you to manually digitize an image from the ground up. You create outlines, assign stitch types, set densities, and build the underlay yourself.
Pros:
-
Complete Control: You can create incredibly precise and beautiful designs.
-
High-Quality Results: Properly digitized designs stitch out cleanly, efficiently, and look professional.
-
Ability to Fix Issues: You can adjust for specific fabrics and perfect complex details.
Cons:
-
Steep Learning Curve: It takes time and practice to become proficient.
-
Expensive: Professional-grade software is a significant investment.
Best for: Serious hobbyists and professional embroiderers.
3. Professional Digitizing Services
This is often the best option for beginners who want a guaranteed great result without the learning curve. You send your image to a skilled digitizer, and they hand-craft a perfect embroidery file for you.
Pros:
-
Expert Quality: You get a file optimized for your specific machine and fabric.
-
Saves Time: No need to learn complex software.
-
Reliability: The design will almost certainly stitch out correctly the first time.
Cons:
-
Cost: You pay per design, usually between $10 and $50+, depending on complexity.
-
Turnaround Time: You may have to wait a day or two for the finished file.
Best for: Anyone who wants a professional-quality result for a special project without doing the digitizing themselves.
Preparing Your Image for the Best Results
No matter which method you choose, starting with a good image is crucial. You can’t digitize a blurry, low-resolution photo and expect a crisp embroidery design.
Follow these tips for the best source image:
-
High Contrast is Key: Simple images with clear, bold lines and solid colors work best.
-
Simplify: Remove unnecessary background details and tiny elements that won’t translate well into stitches.
-
Think in Solid Colors: Embroidery uses solid thread colors, not gradients. Your image should work well when broken down into 2-6 flat colors.
-
Size Matters: Ensure your image is large enough and has a high resolution (300 DPI is a good benchmark) so the details are clear.
A vector file (like an .SVG or .AI) is the absolute gold standard for conversion, as it uses clean paths and shapes instead of pixels.
The Step-by-Step Conversion Workflow
Here’s a general overview of what the process looks like, whether you’re doing it yourself or hiring it out:
-
Choose Your Image: Select a clear, simple graphic that will translate well to thread.
-
Clean It Up: Use a basic photo editor to increase contrast, remove backgrounds, and simplify details.
-
Choose Your Method: Decide whether to use auto software, manual software, or a service.
-
Digitize: This is where the magic happens—translating the image into stitches.
-
Save in the Correct Format: Export the final design in the file format your specific embroidery machine uses (e.g., .PES for Brother, .DST for Tajima).
-
Stitch a Test Run: Always stitch your new design on a scrap piece of similar fabric first! This helps you check for errors, tension issues, or design flaws before stitching it on your final project.
Conclusion: Your Stitching Journey Starts Here
Converting an image to an embroidery file might seem like a mysterious technical process, but it’s simply about speaking your machine’s language. While auto-digitizing software offers a tempting shortcut, for truly beautiful and reliable results, you’ll either need to embrace the learning curve of manual digitizing or lean on the expertise of a professional service.
Start with a simple, bold image, manage your expectations, and don’t be afraid to make mistakes on test fabric. Every stitched-out design is a learning experience. With this knowledge, you’re now ready to take that first step and transform your favorite images into unique, hand-crafted embroidered creations. Happy stitching.